Removing a tree stump can be a hassle, but there are five effective ways to get the job done, each suited to different needs, budgets, and timelines:
- Chemical Decomposition (Epsom Salt): A low-cost, low-effort option that slowly decomposes the stump over months. Ideal for small stumps but requires patience.
- Manual Digging: A hands-on method using tools like shovels and axes. Best for small stumps with shallow roots, but it’s physically demanding.
- Stump Grinding: A faster method using a machine to grind the stump into wood chips. Rent equipment for DIY or hire professionals for larger stumps.
- Burning: A budget-friendly option for dry stumps in areas where open burning is allowed. Requires careful supervision and adherence to fire regulations.
- Professional Services: The quickest and safest option for large or multiple stumps. Costs more but eliminates effort and risk.
Each method has pros and cons based on stump size, time, and effort required. Below is a quick comparison of the methods to help you decide.
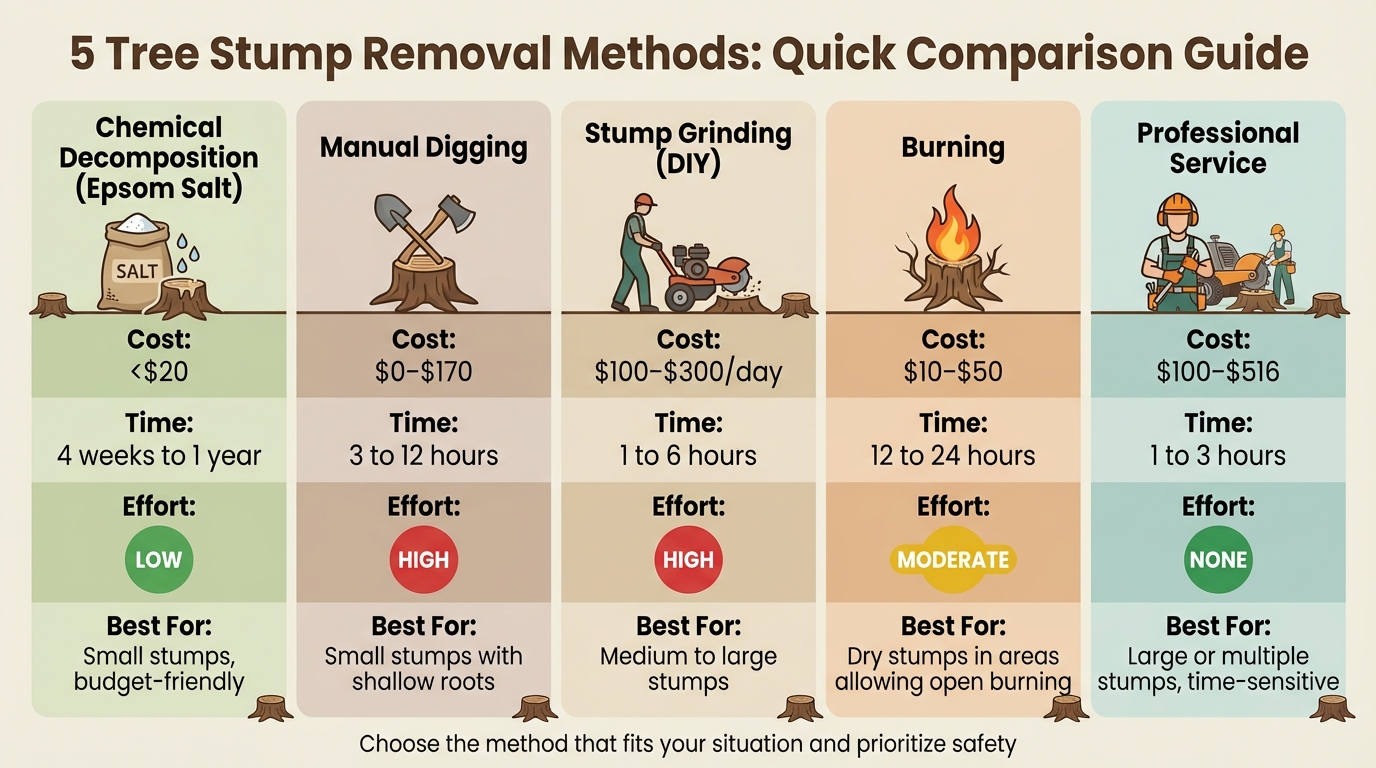
Quick Comparison
| Method | Cost | Time Required | Effort Required | Best For |
|---|---|---|---|---|
| Chemical (Epsom Salt) | <$20 | 4 weeks to 1 year | Low | Small stumps, budget-friendly |
| Manual Digging | $0–$170 | 3 to 12 hours | High | Small stumps with shallow roots |
| Stump Grinding (DIY) | $100–$300/day | 1 to 6 hours | High | Medium to large stumps |
| Burning | $10–$50 | 12 to 24 hours | Moderate | Dry stumps in areas allowing open burning |
| Professional Service | $100–$516 | 1 to 3 hours | None | Large or multiple stumps, time-sensitive |
Choose the method that fits your situation, and remember to prioritize safety, especially when working with machinery or fire.
Tree Stump Removal Methods Comparison: Cost, Time, and Effort Guide
How to Remove Tree Stumps (4 EASY DIY Methods)
Method 1: Chemical Decomposition with Epsom Salt
Using Epsom salt is an affordable and straightforward way to remove a tree stump. According to Greenway Biotech, Inc., "Epsom salt is hygroscopic, meaning it naturally attracts and absorbs water molecules. When packed into drilled holes, it pulls moisture from the surrounding wood cells." This process dries out the stump, making it easier for fungi and bacteria to break it down.
Unlike rock salt, which can harm the soil, Epsom salt actually benefits the surrounding area by releasing magnesium and sulfur. These nutrients are essential for plant growth, aiding in both chlorophyll production and protein synthesis.
How to Use Epsom Salt
Start by cutting the stump as close to the ground as possible to minimize the treatment area. Next, use a 1-inch spade bit to drill holes that are 8 to 10 inches deep. Space the holes about 3 to 4 inches apart across the stump’s surface, angling some toward the center or sides to help the salt penetrate more effectively.
Fill each hole about three-quarters full with dry Epsom salt, using 1–2 pounds of salt per foot of the stump’s diameter. Lightly moisten the salt – just enough to activate it without washing it away. Cover the stump with a dark, waterproof tarp or plastic to keep rain from diluting the salt and to block sunlight, which could encourage regrowth.
Check on the stump every three weeks. If the holes are empty or the wood hasn’t darkened, reapply the salt. For quicker results, you can expose the main roots and treat them directly to stop nutrient flow. Typically, the stump will die within 2 to 3 months of consistent treatment. Complete decomposition can take 6 to 12 months, depending on the tree type. Hardwoods like oak and maple may take up to 18 months, while softwoods like pine decompose in as little as 6 to 8 months.
While this method is simple and low-cost, it does require patience. Here’s a breakdown of its advantages and drawbacks.
Pros and Cons of Chemical Decomposition
This approach is ideal for smaller stumps (under 12 inches in diameter) and those who prefer a low-effort, budget-friendly option. The total cost usually stays under $50, with Epsom salt itself costing between $5 and $15.
| Pros | Cons |
|---|---|
| Affordable ($5–$15 for salt) | Slow process (6–12 months for full decay) |
| Safe for the environment; enriches soil | Needs reapplication every 3 weeks |
| Minimal physical effort | Unsuitable for large stumps with deep roots |
| Non-toxic for pets and children | Stump and tarp can be an eyesore during treatment |
| No need for heavy machinery or rentals | Results vary by tree species and soil conditions |
Linda Chalker-Scott, an Extension Urban Horticulturist at Washington State University, warns that "misuse of magnesium sulfate causes nutrient problems in the soil." To avoid this, apply the salt carefully and sparingly. Once the stump turns dark, brittle, and dry, you can speed up the final decomposition by adding a high-nitrogen fertilizer, like blood meal, to nourish the microbes breaking down the wood.
Method 2: Manual Digging and Root Cutting
Manual stump removal is a hands-on, affordable option, especially for smaller stumps under 12 inches in diameter with shallow roots, like those from maple or willow trees. If you’re equipped with basic tools and ready for some physical work, you can get the job done for as little as $10–$50.
The process involves digging around the stump to expose and cut through its roots, then prying the root ball free. According to Bryan Trandem, a Master Gardener:
"this method has the advantage of being the least expensive option, but be prepared to spend quite a lot of time as well as effort to get the job done".
Depending on the stump’s size and root complexity, expect to spend anywhere from 2 to 12 hours on the task.
One big plus of this method is that it completely removes the root ball, eliminating any chance of regrowth. However, as Roger Cook, a Landscape Contractor with This Old House, points out:
"manually removing stumps is exhausting and tedious work".
This approach isn’t suitable for large stumps or those with deep taproots. Below, you’ll find a list of tools and a step-by-step guide to make the process more manageable.
Tools Needed for Manual Removal
To tackle manual stump removal, you’ll need the right tools and proper safety gear. Here’s what you’ll need:
- Shovel: Essential for digging the trench and moving soil.
- Mattock (Pickaxe): Helps loosen compacted dirt and chop through roots.
- Loppers: Perfect for cutting smaller roots under 2 inches thick.
- Bow Saw or Axe: Used for thicker roots and the central taproot. An axe typically costs $30–$40, while a bow saw runs $10–$30.
- Digging Bar: Useful for prying the stump and reaching deep roots, priced around $30–$50.
- Reciprocating Saw (optional): Speeds up cutting larger roots when fitted with a pruning blade.
- Safety Gear: Steel-toed boots, heavy-duty gloves, safety glasses, and hearing protection if using power tools.
| Tool | Primary Function | Best For |
|---|---|---|
| Shovel | Digging and soil removal | All stump sizes |
| Mattock | Loosening soil, chopping | Breaking hard ground |
| Axe | Heavy chopping | Thick roots and taproots |
| Bow Saw | Precision cutting | Medium-sized roots |
| Digging Bar | Prying and poking | Deeply buried roots |
| Loppers | Snapping small roots | Roots under 2 inches |
Step-by-Step Guide to Manual Removal
- Pre-soak the Soil: Water the area around the stump for 1–2 days to soften the soil, making it easier to dig without turning it into mud.
- Trim the Stump: Use a chainsaw to cut the stump as close to ground level as possible, reducing the area to excavate.
- Excavate Around the Stump: Dig a circular trench about 2–3 feet from the stump to expose the lateral roots. Use a shovel and mattock to remove the loosened soil. Keep a five-foot safety perimeter around your work area.
- Sever the Roots: Cut the roots as you uncover them. Use loppers for smaller roots and a bow saw or axe for thicker ones. For large roots, make two cuts to create space for further digging.
- Address the Taproot: Dig beneath the root ball to find the vertical taproot. Use a pry bar to rock the stump and identify which roots are still anchoring it. Once exposed, cut the taproot with an axe or bow saw. A sturdy block of wood can act as a fulcrum to increase leverage while prying.
- Extract and Restore: Lift the stump out of the ground using a digging bar. For larger stumps, you may need extra help or equipment. After removal, fill the hole with a mix of excavated and topsoil, tamping it down in layers to prevent future settling.
Pros and Cons of Manual Digging
| Advantages | Disadvantages |
|---|---|
| Low cost if tools are already owned | Extremely labor-intensive and physically demanding |
| Immediate results once finished | Can take hours or even days for larger stumps |
| No need for machinery or chemicals | Not suitable for large stumps or deep taproots |
| Minimal impact on surrounding landscape | Risk of injury if tools are used improperly |
This method works best for small, accessible stumps if you’re ready to put in the effort. It can be easier if the stump has dried out for a year or two, as dry wood is less resilient than fresh wood. Keep in mind, though, you’ll need to dispose of the heavy root ball afterward – some homeowners repurpose it as natural mulch over time.
Method 3: Stump Grinding
Stump grinding is a quick and efficient way to remove stumps using a powerful machine equipped with carbide-tipped teeth. This machine grinds the stump into wood chips, avoiding the need for extensive digging or chemical treatments. Landscape Contractor Roger Cook from This Old House describes it well:
"It’s a gas engine, and it powers carbide teeth which turn and eat away at the stump like a piece of corn".
The process involves clearing rocks and debris around the stump, cutting it flush to the ground with a chainsaw, and then grinding it down – typically 6 to 10 inches below the soil surface. The resulting hole is filled with wood chips or fresh soil. For reference, grinding a 20-inch oak stump usually takes about 45 to 60 minutes.
While stump grinding is fast, it does leave the root system behind to decompose naturally. This can sometimes lead to resprouting in species with aggressive root systems, such as Tree of Heaven or Acacia.
How Stump Grinding Works
The grinder’s cutting wheel, armed with carbide teeth, shaves the stump down layer by layer. To begin, position the blade above the stump, then lower it gradually while moving side to side. The wood chips produced can be used as mulch or removed altogether.
Before grinding, it’s essential to clear the area of rocks and stones to avoid damaging the grinder teeth, which can cost $15 per tooth to replace. Additionally, always call 811 or contact local utility companies to ensure there are no underground gas, electric, or water lines in the area – tree roots often grow around these utilities.
Professional-grade stump grinders are heavy-duty machines, often weighing over 1,000 pounds, and require special equipment for transport. These machines are loud and can send debris flying, so proper safety gear is a must. This includes hearing and eye protection, a face shield, heavy gloves, and steel-toed boots.
The decision to rent or hire professionals depends on the size and location of the stump, as well as your comfort level with operating machinery.
DIY vs. Professional Stump Grinding
Renting a stump grinder is an option for smaller jobs. Costs range from $50 to $220 for a half-day rental. Rental units are typically walk-behind models with 25 HP engines and 16-inch cutters. They’re suitable for grinding one to three small or medium stumps but require a vehicle with a trailer hitch for transport. Operating the machine also demands significant physical effort.
For larger or multiple stumps, professional services are often the better choice. Professionals use hydraulic equipment that’s far more powerful and efficient than rental units. As Family Handyman notes:
"A pro might be a better option for those who have more than five or six good-sized stumps to remove… pros use hydraulic equipment that grinds large stumps much faster than a rental grinder can".
Professional services typically charge about $2 per inch of stump width or a flat rate starting at $100 and going up to several hundred dollars per stump. For exceptionally large or hard-to-reach stumps, costs can climb to $800. Homeowners can save up to 50% by opting to handle the cleanup of wood chips themselves.
Companies like Viking Tree & Stump bring trained professionals who handle risks such as flying debris, kickback, and working near utilities or structures, ensuring the job is done safely and efficiently.
Pros and Cons of Stump Grinding
| Advantages | Disadvantages |
|---|---|
| Quick – most stumps take 45 to 60 minutes to grind | Leaves deep roots to decay naturally |
| Minimal soil disruption compared to digging | Rental equipment is heavy and challenging to transport |
| Produces wood chips that can be used as mulch | Risk of injury from flying debris and kickback |
| No need for chemical treatments | Some species may resprout from remaining roots |
| Professional services available for large or multiple stumps | Costs range from $50–$220 for rental or $100+ for professional services |
If you’re dealing with a few small stumps, renting a grinder might be a practical option, provided you’re comfortable with the equipment. For larger projects or stumps near utilities or structures, hiring professionals can save time and reduce risks while ensuring the job is done right.
Method 4: Burning the Stump
Burning is a straightforward, low-cost option (around $10–$50) for removing small to medium stumps, especially in rural areas where open burning is allowed. However, it’s crucial that the stump is completely dry – ideally, it should have been cut at least a year earlier.
The process involves drilling holes into the stump, filling them with potassium nitrate to boost flammability, and igniting the stump with dry kindling. Typically, the burn takes 12–24 hours, though larger or damp stumps might smolder for days or even weeks.
Bob Frazee, a retired University of Illinois Natural Resources Educator, explains:
"A hot fire is required to burn out stumps since the wood absorbs moisture from the soil and burns like green wood. Stumps will burn best during dry seasons".
While burning eliminates the stump and its roots, it comes with fire risks and requires constant supervision. Avoid burning stumps larger than four feet in diameter. Below is a step-by-step guide for safely burning a stump.
Steps for Safely Burning a Stump
- Prepare the Area: Clear away any flammable materials, such as leaves, dry grass, or sticks, from the area surrounding the stump. Keep a pressurized water hose nearby for safety.
- Cut and Drill the Stump: Use a chainsaw to cut the stump as close to the ground as possible. Drill a center hole 8–10 inches deep at a 30° angle using a 1-inch spade bit. Then, drill additional holes across the top surface every 1–3 inches, connecting them with side holes to improve airflow.
- Add Potassium Nitrate: Fill the drilled holes with potassium nitrate granules, then pour hot water into the holes to help the chemical soak into the wood fibers.
- Ignite the Stump: Build a small teepee of scrap wood over the stump and ignite it using natural kindling like dryer lint or dry leaves. Avoid using gasoline – it’s highly explosive and can cause dangerous flare-ups. If needed, use kerosene or fuel oil as an accelerant.
- Contain the Fire: Cover the burning stump with a metal grate or wire mesh to prevent embers from escaping. Monitor the fire until the stump is fully burned to ash.
- Clean Up: Once the burn is complete, break up any remaining roots with an axe or shovel. Transfer the debris to a fire-safe container and fill the hole with fresh soil.
Before starting, make sure to review local laws and safety guidelines to minimize fire hazards.
Legal and Safety Considerations
Always check local regulations before burning a stump. For example, in Michigan, open burning must be at least 1,400 feet away from the boundary of an incorporated city or village, and a burn permit is required unless the ground is snow-covered or an approved burn barrel is used. Northern county residents typically get permits through DNR Forest Management offices, while southern county residents contact their local fire department.
Additionally, burning stumps on ice, in wetlands, or near water bodies is prohibited to avoid water contamination.
The Michigan Department of Environment, Great Lakes, and Energy (EGLE) emphasizes:
"Open burning pollutes the air and poses a forest fire hazard. The air pollution created by open burning can irritate eyes and lungs, obscure visibility, soil nearby surfaces, create annoying odors or pose other nuisance or health threats".
Always ensure there are no underground utilities or nearby structures that could be harmed by the heat. Underground roots can smolder for days, potentially damaging septic systems or foundations if the tree was close to a building. At least one adult should monitor the fire at all times.
Pros and Cons of Burning
| Pros | Cons |
|---|---|
| Inexpensive ($10–$50 in materials) | Significant fire risk to nearby structures |
| Destroys the root system completely | Requires extended monitoring (12–24+ hours) |
| Less labor-intensive than manual removal | Produces smoke and air pollution |
| Suitable for small to medium stumps | Often restricted by local burn ordinances |
| Works well on partially rotted stumps | Underground roots may smolder for days or weeks |
Burning is a practical choice for those in rural areas dealing with smaller stumps and who have time to supervise the process. However, in suburban neighborhoods or when facing multiple stumps, hiring a professional service might be a safer and more efficient solution.
sbb-itb-a61c528
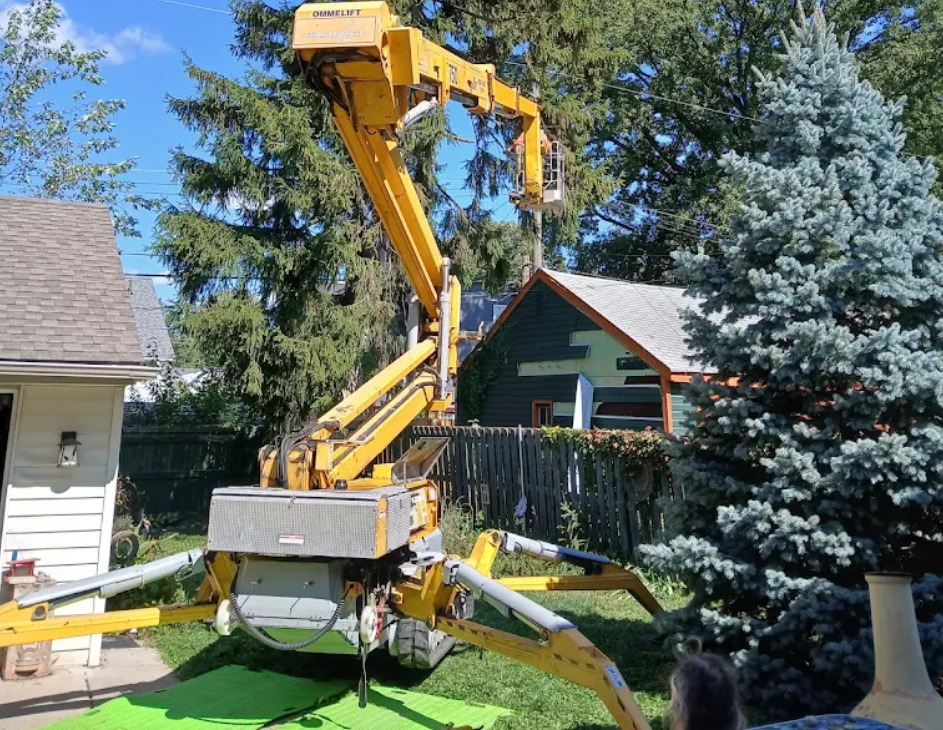
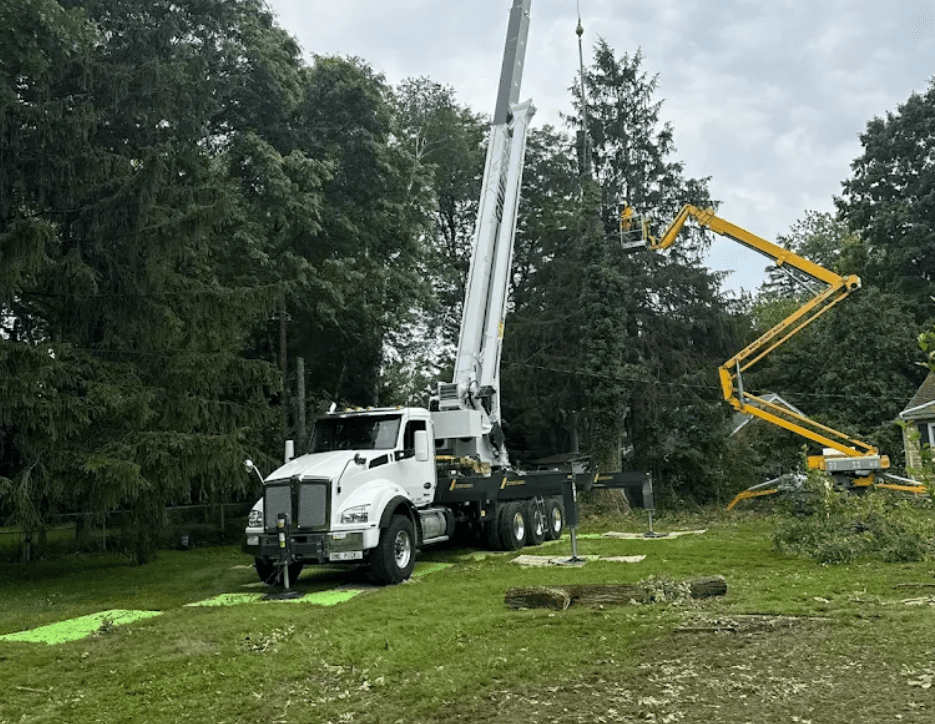
Method 5: Professional Stump Removal Services
When tackling a large stump, multiple stumps, or simply aiming to save time and effort, hiring professional stump removal services can be a smart move. Companies like Viking Tree & Stump use powerful hydraulic equipment, completing the job in just 1 to 6 hours – far quicker than DIY methods that can take days.
Beyond speed, professional services significantly reduce the safety risks associated with DIY stump grinding. Stump grinders are high-powered machines that, when misused, can cause serious injuries or property damage. Kaitlyn Pacheco, Content Editor at Angi, emphasizes this point:
"Stump grinders are high-risk tools that can accidentally propel objects and debris. When using a stump grinder, equip yourself with protective gear and thoroughly clear the area. Alternatively, hire a professional."
Certified arborists not only handle the grinding process but also manage challenges like underground utilities, confined spaces, and complex root systems with ease.
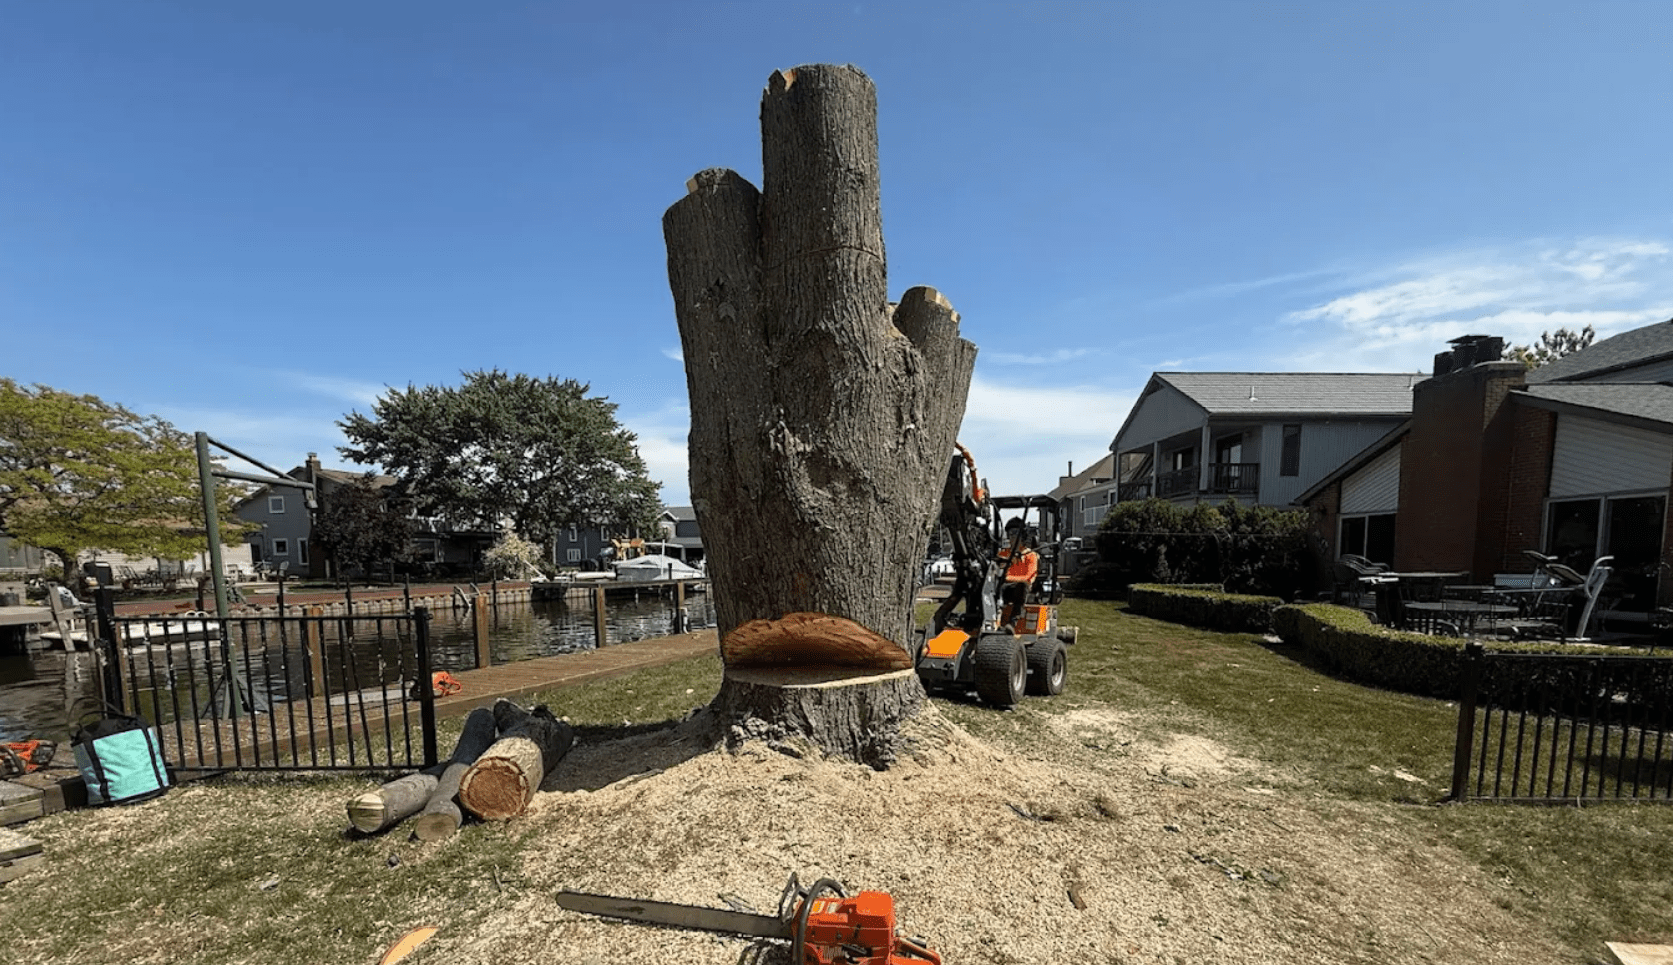
What to Expect from Professional Services
The process usually begins with a site evaluation to assess the stump’s size, location, and any potential obstacles. Pricing is typically around $2 per inch of stump diameter, with most projects costing between $150 and $500.
Once the work starts, professionals use industrial-grade hydraulic grinders to break down the stump and major lateral roots into wood chips. The grinding itself usually takes 1 to 6 hours, depending on the stump’s size and root complexity. As Family Handyman notes:
"The pros use hydraulic equipment that grinds large stumps much faster than a rental grinder can. So it might cost less to hire the pro than to rent the grinder."
Many companies also offer cleanup services, such as hauling away wood chips and filling the hole with topsoil. If you’re looking to save money, you can often reduce costs by handling the cleanup yourself – sometimes by as much as 50%. Be sure to confirm what’s included in your quote before work begins.
Why Choose Viking Tree & Stump
Viking Tree & Stump brings over 20 years of expertise to stump removal projects in Oakland and Macomb counties. Their certified arborists can handle stumps of all sizes, from small decorative remnants to massive oak or maple stumps.
What makes Viking Tree & Stump stand out is their thorough approach. They don’t just grind the stump’s surface – they also offer complete root extraction, which prevents regrowth and avoids future settlement issues. They specialize in navigating tight spaces, such as older urban properties with limited access. With more than 80 five-star reviews, customers frequently commend their professionalism, clear pricing, and attention to detail. One satisfied client shared:
"The most professional tree service I’ve worked with. From quote to completion, they were transparent, thorough, and respectful of our property."
Viking Tree & Stump also provides 24/7 emergency services for storm-related damage, making them a dependable choice for both routine and urgent needs.
Pros and Cons of Professional Services
| Pros | Cons |
|---|---|
| Quick completion (1–6 hours vs. days or weeks) | Higher upfront cost (around $150–$500) |
| Deep grinding allows for immediate replanting | Requires scheduling and availability |
| Reduces safety risks by avoiding DIY equipment | Cleanup may cost extra unless specified |
| Handles stumps of any size, even large remnants | Less direct control over the process |
| Certified arborists manage utilities and tight spaces | Additional fees for root extraction or restoration |
| Can be more cost-effective than renting equipment for multiple days |
For large or multiple stumps, professional services provide a reliable and efficient solution. Check the comparison section to see how this method stacks up against other options.
Comparison of All 5 Methods
Here’s a breakdown of the five stump removal methods to help you weigh your options. The best choice for you will depend on your budget, how quickly you want the stump gone, and how much effort you’re willing to put in. Each method comes with its own pros and cons.
Chemical decomposition is the least labor-intensive DIY option, costing less than $20. The catch? It requires patience, as the process can take anywhere from 4 weeks to an entire year for the stump to fully decompose.
Manual digging is another DIY approach, with costs ranging from $0 to $170. This method typically takes between 3 and 12 hours and is best for small stumps under 12 inches in diameter.
Stump grinding strikes a balance for DIY enthusiasts willing to rent equipment. Rental costs range from $100 to $300 per day, and the job can take 1 to 6 hours. However, safety and skill are key here – rental grinders often weigh around 1,000 pounds. Gerald Williams, Owner of C-Trees & More, cautions:
"I’ve seen people rent these machines and try to do it themselves. They get worked to death trying to remove the stump with one of these small grinders, and then they still end up calling a professional in to do the job".
Burning is a quick, low-cost DIY option, taking 12 to 24 hours to complete. However, this method isn’t always practical. Open burning is prohibited in many urban and suburban areas, and smoldering underground roots can pose safety risks for weeks.
Professional services offer a hassle-free solution, with no physical effort required. Professionals typically remove stumps in 1 to 3 hours, with costs ranging from $100 to $516 per stump (averaging around $326). For larger stumps or time-sensitive projects, this can be more cost-effective than renting equipment for multiple days.
Here’s a side-by-side comparison to make it easier:
| Method | Cost | Time Required | Effort Required | Best For |
|---|---|---|---|---|
| Chemical (Epsom Salt) | <$20 | 4 weeks to 1 year | Low | Homeowners on a budget with no rush |
| Manual Digging | $0–$170 | 3 to 12 hours | High | Small stumps (<12 inches) with shallow roots |
| Stump Grinding (DIY) | $100–$300/day | 1 to 6 hours | High | Medium to large stumps |
| Burning | Low (fuel only) | 12 to 24 hours | Moderate | Dry stumps in areas where burning is allowed |
| Professional Service | $100–$516 | 1 to 3 hours | None | Large or multiple stumps, time-sensitive jobs |
Safety Tips and When to Call Viking Tree & Stump
Stump removal can be risky, and each method comes with its own set of safety precautions to protect both you and your property. Whether you’re using a stump grinder, chemicals, or manual tools, proper preparation and caution are essential.
Using a stump grinder means working with a heavy, 1,000-pound machine outfitted with high-speed carbide teeth. To stay safe, wear a polycarbonate face shield, safety goggles, hearing protection, and steel-toed boots. Before starting, clear away any rocks or debris around the stump to avoid dangerous flying projectiles. Most importantly, locate and mark underground utilities like gas lines, buried power cables, and sprinkler systems to prevent accidental damage. These precautions are critical no matter the method you choose.
If you’re working with potassium nitrate, safety gear is a must. Use protective eyewear, work gloves, and long sleeves. Keep children, pets, and wildlife out of the area until the chemicals are fully absorbed. When drilling holes for chemical application, angle them at 45 degrees to connect with vertical holes – this prevents the liquid from spilling into the surrounding soil.
For burning, extra fire safety measures are non-negotiable. Never use gasoline or motor oil. Stick to kerosene or fuel oil, and always have a hose or fire extinguisher nearby. Never leave the fire unattended, and make sure to check local fire regulations first, as open burning is often prohibited in urban and suburban neighborhoods.
To avoid injuries like back strain, take regular breaks during manual labor. And while it might be tempting, don’t try pulling a stump out with a pickup truck – snapping chains can cause serious injuries or damage your vehicle.
For large stumps, limited equipment, or situations where physical labor could be dangerous, calling Viking Tree & Stump is the smart choice. Professional help is especially crucial for stumps near foundations, utility lines, or when dealing with multiple removals. As Kaitlyn Pacheco, Content Editor at Angi, points out:
"Stump grinders are high-risk tools that can accidentally propel objects and debris."
Viking Tree & Stump’s certified arborists use commercial-grade equipment to handle these risks safely and efficiently. They also ensure a thorough cleanup, saving you time and avoiding potential injuries. By keeping these safety tips in mind, you can confidently decide on the best approach for your stump removal needs.
Conclusion
Removing a tree stump doesn’t have to be overwhelming when you understand your options. Whether you choose chemical decomposition for a slower, low-effort approach, manual digging for smaller stumps, stump grinding for quick results (typically within a few hours), or burning where it’s permitted, each method has its own advantages. Professional services, on the other hand, take the stress and physical labor out of the equation. The key is matching the method to your specific needs.
Your decision will largely depend on the size of the stump, your budget, and how much time and effort you’re willing to dedicate. Smaller stumps are often manageable with DIY methods, while larger or multiple stumps usually call for grinding equipment or professional expertise. As mentioned earlier, the performance and practicality of each method vary based on these factors.
It’s also important to weigh the risks involved. As Aaron Steil from Iowa State University Extension explains:
"The quickest, easiest, and safest way to remove a tree stump is by hiring an arborist to grind it out".
DIY approaches, while cost-saving, come with hazards like debris from grinders or the potential dangers of burning. Additionally, rental equipment may not always be sufficient for tougher jobs.
For those in Oakland and Macomb counties, Viking Tree & Stump offers professional services tailored to residential and commercial needs. Their certified arborists and commercial-grade machinery handle everything from single stump removal to extensive storm cleanup. With 24/7 emergency response, they ensure safe and efficient stump removal without the risks or hard labor of doing it yourself. For expert care in metro Detroit, Viking Tree & Stump has the experience and tools to get the job done right.
FAQs
What’s the quickest way to remove a large tree stump?
The fastest way to get rid of a large tree stump is by hiring a professional stump grinding service. This approach is efficient and usually takes just a few hours, making it ideal for handling large or particularly stubborn stumps.
For those who prefer to tackle the job themselves, renting a stump grinder is another quick option. However, keep in mind that operating this equipment safely requires some prior experience. Ultimately, the best method depends on your comfort level and the size of the stump.
Are there environmental risks when using Epsom salt to remove a tree stump?
Using Epsom salt to get rid of a tree stump can come with some risks to your yard if not used carefully. Too much salt can change the soil’s makeup, which might harm nearby plants and affect overall soil health. To avoid these issues, use the salt sparingly and keep it confined to the stump area. By applying it correctly, you can break down the stump while keeping your yard’s natural balance intact.
What safety precautions should I take when burning a tree stump?
Burning a tree stump can work well, but safety should always be your top priority. Start by contacting your local fire department to confirm if burning is permitted in your area and to learn about any specific rules you need to follow.
Before lighting the fire, clear away any flammable materials around the stump, such as leaves, sticks, or dry grass. You might also want to set up a barrier – chicken wire works well – to help keep the fire contained.
Keep a water source nearby at all times. A garden hose or buckets of water can be crucial in case of an emergency. Avoid burning on windy days, as gusts can spread the fire beyond your control. Stick to using dry, dead wood as fuel and never use accelerants like gasoline, which can lead to dangerous flare-ups.
Finally, stay with the fire the entire time and make sure it’s fully extinguished before leaving the area. Constant supervision is key to ensuring everything stays under control.